दोस्तों क्या आप अपना Facebook Account Delete करना चाहते है? तो आप अभी बिल्कुल सही जगह पर हो क्यूंकि आज मैं आप सभी को Facebook Account Delete करने के बारे में बताऊंगा जो आप लोगो को जरुर पसंद आएगा. दोस्तों हम सभी को कभी ना कभी अपना Facebook Account Delete करने की जरुरत पड़ जाती है. इस पोस्ट में मैं आपको Facebook Account Delete करने के दो तरीके बताऊंगा पहला तरीका उनके लिए है जो बस अपना Account Deactivate करना चाहते है लेकिन दूसरा तरीका उनके लिए है जो अपना Facebook Account हमेशा के लिए डिलीट करना चाहते है.
दोस्तों अगर आप फेसबुक चलाते है तो आपको पता होगा की रोजाना फेसबुक पर लाखों अकाउंट रजिस्टर होते है लेकिन बहुत से ऐसे अकाउंट भी होते है जो कभी उपयोग नहीं होते लेकिन फिर भी फेसबुक उसको सर्च रिजल्ट में दिखाता है. अगर आपका भी कोई ऐसा फेसबुक अकाउंट है जिसका आप इस्तेमाल नहीं करते तो आपको उसे डिलीट कर देना चाहिए. बहुत से लोग Facebook Account Delete Kaise Kare यह नहीं जानते तो मैंने सोचा इस बार आप लोगो को इसी चीज की जानकारी दि जाये.
Facebook Account Delete करने से आपके सभी एक्टिविटी फेसबुक से डिलीट हो जायेंगे और आपका कोई फेसबुक फ्रेंड आपको नहीं ढूंढ पायेगा. मेरे हिसाब से फेसबुक पर सिर्फ चालू अकाउंट को होना चाहिए इसलिए अगर आपका भी कोई फेसबुक अकाउंट है जो आप नहीं चलाते उसे डिलीट कर दे इससे लोग फ्रेंड रिक्वेस्ट उसी को भेजेंगे जो फेसबुक पर चालू हो. मैं अब आपका ज्यादा समय नहीं लूँगा और इस पोस्ट को शुरू करता हूँ.
मैं इस पोस्ट में आपको Facebook Account Delete करने के दो तरीके बताऊंगा पहला तरीका Deactivate द्वारा और दूसरा तरीका Delete द्वारा. अब आपके मन में यह सवाल जरुर आ रहा होगा की Deactivate और Delete करने में क्या अंतर है? वास्तव में deactivate का मतलब है कुछ समय के लिए जबकि डिलीट का मतलब है हमेशा के लिए वैसे अकाउंट डिलीट करने के 14 दिन के अंदर आप अपना अकाउंट वापस ला भी सकते हो उसके बाद हमेशा के लिए डिलीट हो जाता है. मैं यह मानकर चल रहा हूँ की आप अब तक हमारी बातों को समझ रहे होंगे तो चलिए पोस्ट की तरफ बढ़ते है और जानते है Facebook Account Delete Kaise Kare.
Facebook Account Delete Kaise Kare? पूरी जानकारी:
दोस्तों जैसा की मैंने आपको बताया था इस पोस्ट में हम आपको Facebook Account Delete करने के दो तरीके बताएँगे पहला तरीका उन लोगो के लिए है जो अपना फेसबुक अकाउंट कुछ समय के लिए डीएक्टिवेट करना चाहते है और दूसरा तरीका उनके लिए जो अपना फेसबुक अकाउंट हमेशा के लिए डिलीट करना चाहते है तो चलिए इन दोनों तरीके को जानते है.
Temporarily Deactivate Facebook Account:
1) अगर आप फेसबुक से अपना अकाउंट कुछ समय के लिए डिलीट करना चाहते है तो सबसे पहले अपना फेसबुक अकाउंट Login करे.
2) अब फेसबुक अकाउंट के Settings में जाये.
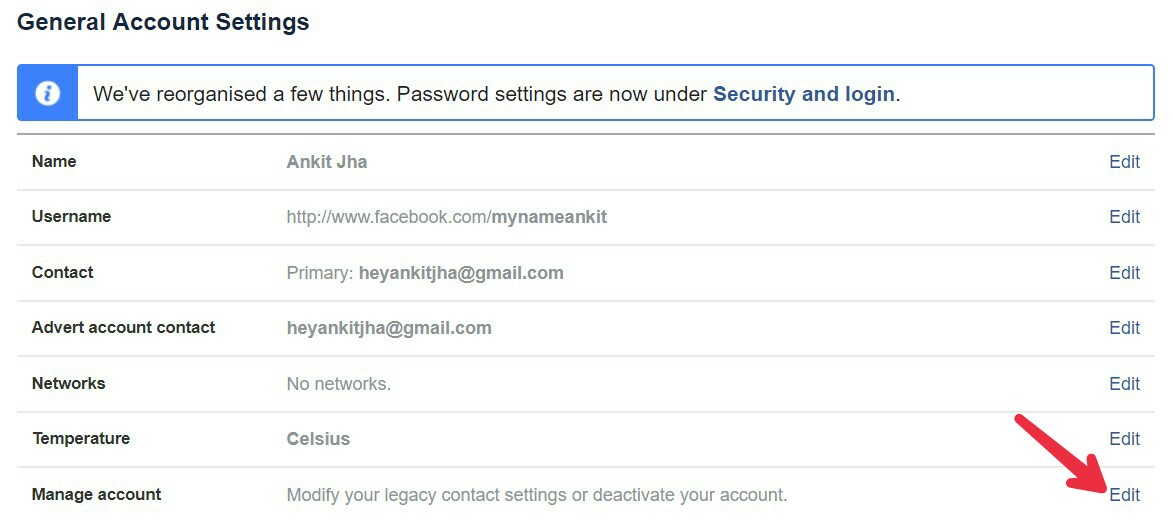
3) अब General settings में Manage account option के Edit button पर क्लिक करे.
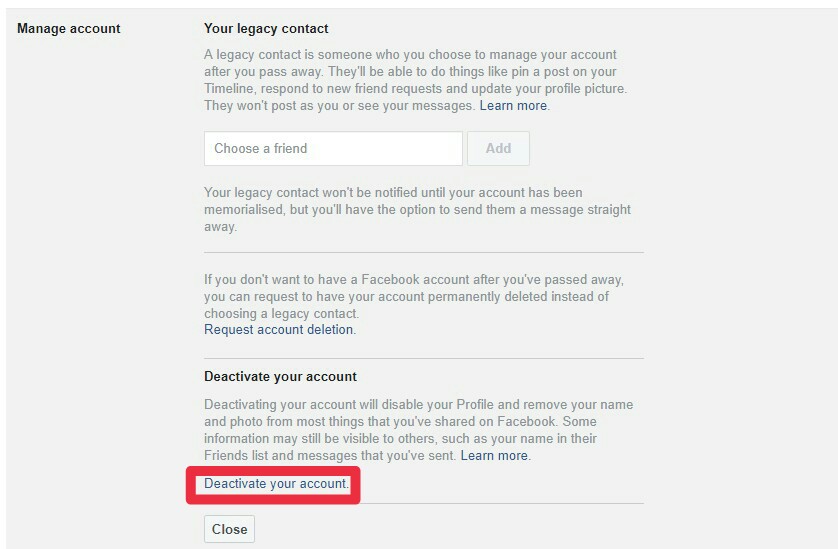
4) Edit button पर क्लिक करने के बाद आपको Deactivate your account का आप्शन दिखाई देगा जिस पर आपको क्लिक करना है.
5) अब आपको अपने फेसबुक अकाउंट का पासवर्ड Enter करने के लिए बोला जायेगा ताकि यह Confirm हो जाये की आप ही असली User है कोई और नहीं.
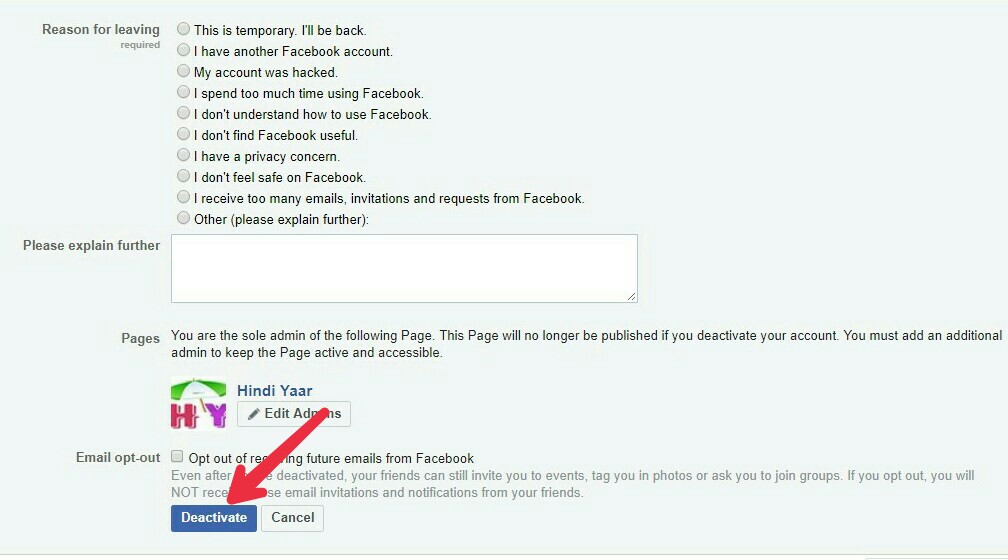
6) आपसे Next page पर फेसबुक अकाउंट डीएक्टिवेट करने का कारण पूछा जायेगा वो सब करने के बाद सीधा Deactivate button पर क्लिक करे.
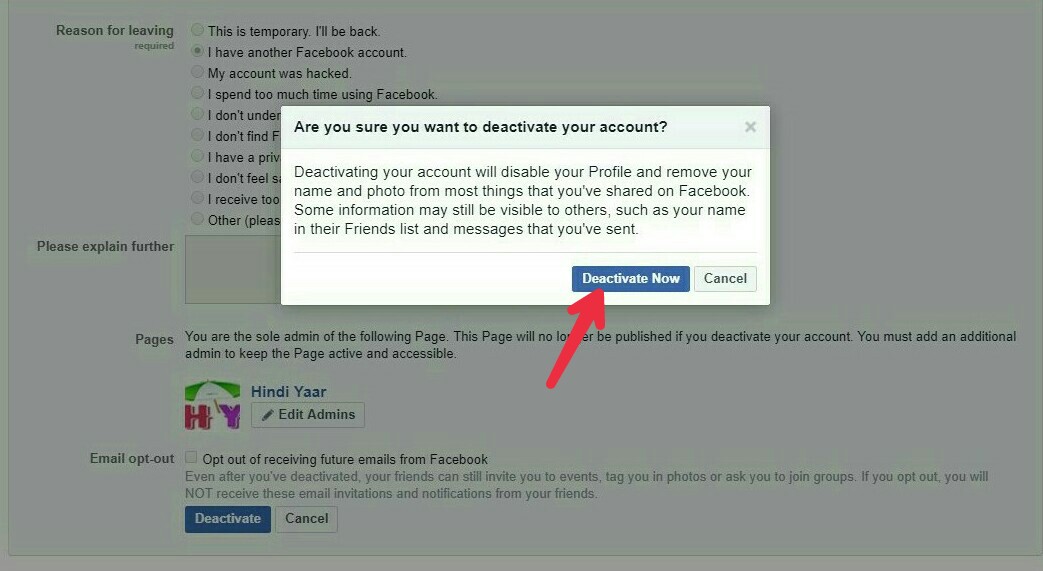
7) आपसे फेसबुक अब Confirm करने की कोशिश करेगा की आप सच में अपना फेसबुक अकाउंट डीएक्टिवेट करना चाहते हो या नहीं. अगर आपने पूरा निश्चय कर लिया है तो Deactivate now पर क्लिक करे.
दोस्तों अगर आप सभी ने हमारे स्टेप्स को फॉलो किया होगा तो अबतक आपका फेसबुक अकाउंट डीएक्टिवेट हो चूका होगा लेकिन ठहरिये, आपको एक बात बताना जरुरी है वो बात यह है की आपने जो अभी किया वो Temporarily है मतलब कुछ समय के लिए है आप जब चाहे अपना फेसबुक अकाउंट दोबारा Active कर सकते हो तब तक आपका कोई दोस्त आपको फेसबुक पर नहीं ढूंढ पाएगा. अकाउंट डीएक्टिवेट करने के बाद आप जब भी अपना अकाउंट Login करते हो वो खुद Active हो जाता है इसलिए जब तक आपका मन ना करे फेसबुक चलाने का तब तक अकाउंट Login मत करना वरना दोबारा आप फेसबुक पर Active हो जाओगे.
Permanently Delete Facebook Account:
जिन लोगो ने निश्चय कर लिया है की अब वो फेसबुक कभी नहीं चलाएंगे उनके लिए यह तरीका है और यह Permanent Method है मतलब एक बार जो अकाउंट डिलीट हो गया समझो हो गया आप उसे वापस Recover नहीं कर सकते. अगर आपको समझ नहीं आ रहा की फेसबुक अकाउंट डिलीट करे या डीएक्टिवेट तो मैं आप सभी को कहूँगा की अकाउंट डीएक्टिवेट करे आप चाहे तो डिलीट भी कर सकते हो क्यूंकि इसमें भी आपको 14 दिन का समय मिलता है अकाउंट को वापस Active करने के लिए.
फेसबुक अकाउंट Permanently Delete करने के लिए आपको बस हमारे इस Link पर क्लिक करना है और आप Facebook Account Delete करने के पेज पर पहुँच जाओगे. इस पेज पर बस आपको अपना फेसबुक अकाउंट पासवर्ड Enter करना है और Submit कर देना है. इस स्टेप को पूरा करने के बाद आपका फेसबुक अकाउंट हमेशा के लिए डिलीट हो जायेगा.
अगर आप वापस अपना फेसबुक अकाउंट चाहते हो तो यह 14 दिन के अंदर ही मुमकिन है अगर आप ऐसा नहीं करते तो आपका अकाउंट फेसबुक से हमेशा के लिए डिलीट हो जायेगा. अपना अकाउंट 14 दिन के अंदर वापस लाने के लिए सबसे पहले अकाउंट Login करे और Cancel Deletion आप्शन पर क्लिक करे ऐसा करते ही आपका फेसबुक अकाउंट Active हो जायेगा.
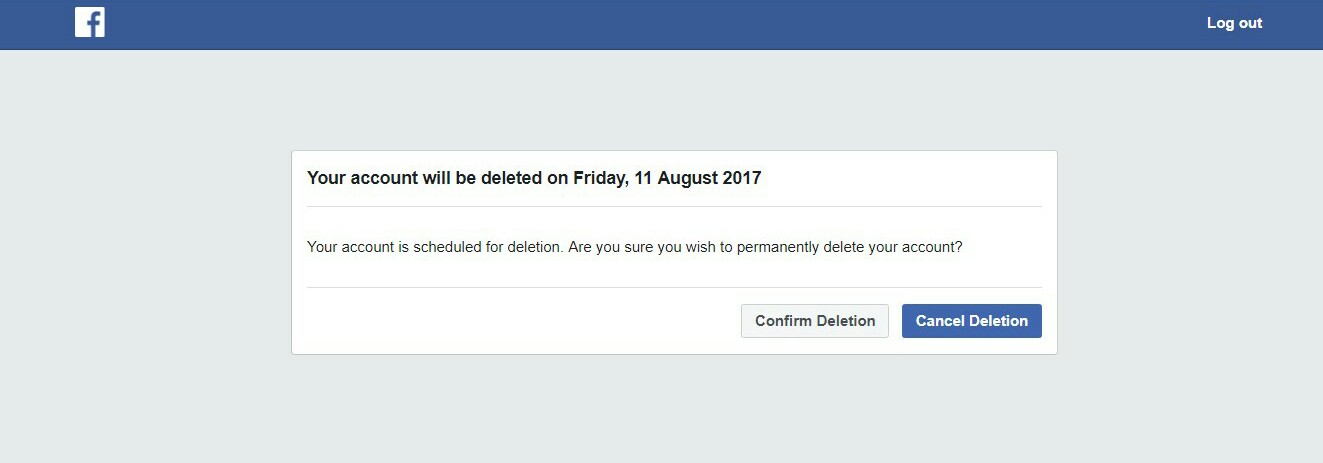
जैसा की आप अभी ऊपर स्क्रीनशॉट में देख सकते हो मैंने एक फेसबुक अकाउंट डिलीट किया और जब उसे 14 दिन के अंदर वापस Login करने की कोशिश की तो कुछ ऐसा नज़र आ रहा है जैसा आप अभी स्क्रीनशॉट में देख रहे हो. यहाँ पर दो आप्शन है पहला आप्शन है Confirm Deletion और दूसरा है Cancel Deletion अगर आप अभी अपना फेसबुक अकाउंट डिलीट करना चाहते है तो Confirm Deletion आप्शन पर क्लिक करे अगर आप वापस अपना फेसबुक अकाउंट Active करना चाहते हो तो Cancel Deletion आप्शन पर क्लिक करे ऐसा करते ही आपका फेसबुक अकाउंट दोबारा चालू हो जायेगा.
Final Words:
तो दोस्तों आज हमने जाना Facebook Account Delete Kaise Kare? मैंने इस पोस्ट में सभी स्टेप्स को स्क्रीनशॉट के जरिये समझाने की कोशिश की है ताकि आप सभी हर स्टेप अच्छे से समझ आए लेकिन फिर भी अगर आपके मन में कोई सवाल हो वो हमें कमेंट करे हम आपके सवाल का उचित उत्तर देने की पूरी कोशिश करेंगे. मैं एक बात तो कहना ही भूल गया अगर पोस्ट पसंद आया हो तो शेयर बटन का प्रयोग करे.